引言
当你在以太坊上部署过合约、在Polygon上构建过DApp之后,是否曾想过自己启动一条独立的区块链?这听起来像是一个需要大量资金和人力的巨型项目,但在Cosmos生态中,一两个开发者完全可以在几周内构建出一条功能完整的应用链。
Cosmos SDK正是为此而生的开发框架。它采用模块化架构,将区块链的通用功能(共识、存储、网络)封装为可复用的组件,开发者只需专注于自己的业务逻辑。这种设计理念让区块链开发从”从零造轮子”变成了”搭积木”。
本文将带你从零开始,使用Go语言和Cosmos SDK构建一条简单的应用链。学完这篇文章,你将理解Cosmos SDK的核心概念,掌握模块开发的基本流程,并能够独立启动一条可运行的区块链。
环境配置与项目初始化
Go语言环境准备
Cosmos SDK完全基于Go语言开发,因此第一步是配置好Go环境。建议使用Go 1.21及以上版本,这个版本对泛型和性能都有较好的支持。
bash
# 检查Go版本
go version

# 如果没有安装或版本过低,通过官方脚本安装
curl -Ls https://go.dev/dl/go1.21.7.linux-amd64.tar.gz | sudo tar -xzf - -C /usr/local
export PATH=$PATH:/usr/local/go/bin
安装完成后,配置GOPATH和项目目录:
bash
# 在 ~/.bashrc 或 ~/.zshrc 中添加
export GOPATH=$HOME/go
export PATH=$PATH:$GOPATH/bin:/usr/local/go/bin
export GO111MODULE=on

# 验证配置
go version
go env GOPATH
Ignite CLI安装
Ignite是Cosmos官方推荐的脚手架工具,可以快速生成应用链项目结构。虽然我们也可以手动创建,但Ignite能省去大量重复配置工作。
bash
# 安装Ignite CLI
curl -sL https://get.ignite.com/install.sh | bash

# 验证安装
ignite version
对于国内开发者,可以使用代理加速:
bash
export GOPROXY=https://goproxy.cn,direct
curl -sL https://get.ignite.com/install.sh | bash
第一个Cosmos项目
使用Ignite创建一个新的区块链项目。这里我们构建一个简单的”博客链”作为示例,它允许用户发布和阅读链上文章:
bash
ignite scaffold chain blog

cd blog
执行完毕后,你会看到如下项目结构:
plaintext
blog/
├── cmd/
│   └── blogd/           # 应用程序入口
│       ├── main.go
│       └── root.go
├── proto/               # Protobuf协议文件
│   └── blog/
│       └── query.proto
├── x/                   # SDK模块目录
│   └── blog/           # 主业务模块
│       ├── keeper/     # 状态管理
│       ├── module.go   # 模块定义
│       └── types/      # 类型定义
├── Makefile
└── config.yml          # Ignite配置文件
这个结构是Cosmos SDK的标准目录布局。cmd目录存放应用程序入口,proto目录定义数据结构,x目录包含所有业务模块。
Cosmos SDK核心概念解析
应用链架构
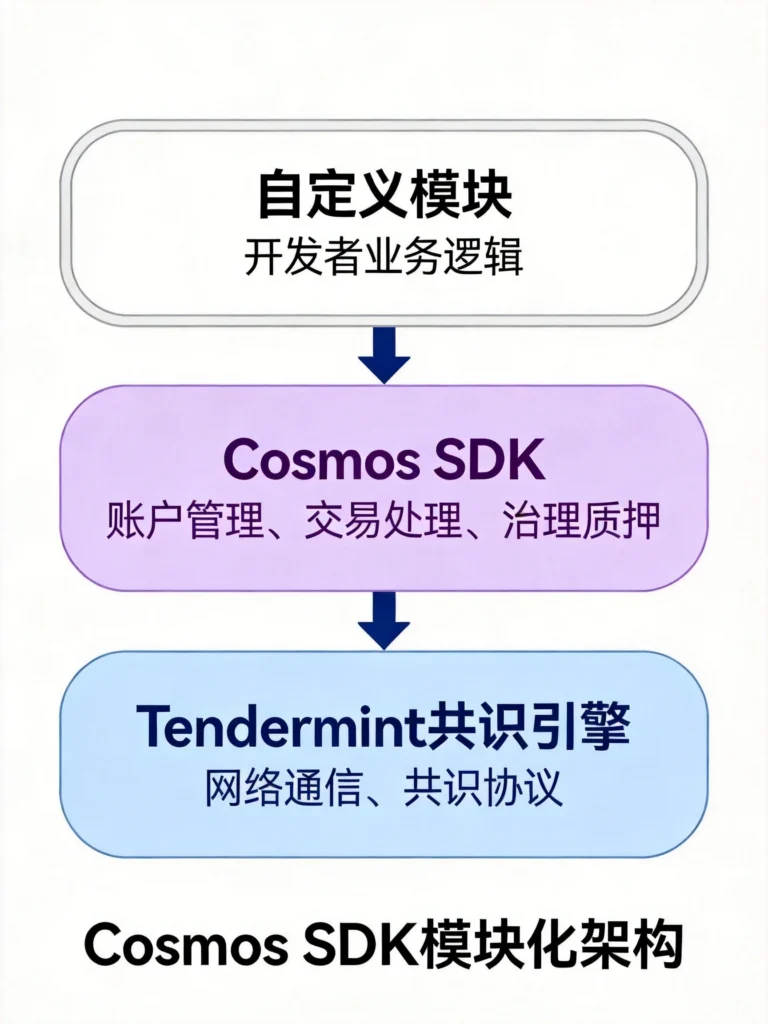
在深入代码之前,理解Cosmos SDK的架构至关重要。与以太坊的单体架构不同,Cosmos采用模块化设计:
基础层:Tendermint共识引擎
- 处理网络通信和共识协议
- 提供ABCI接口与应用层交互
- 支持即时最终性(vs以太坊的概率最终性)
应用层:Cosmos SDK
- 提供交易处理、区块验证的基础功能
- 实现账户和签名管理
- 内置治理和质押模块
业务层:自定义模块
- 开发者根据需求实现的具体功能
- 复用SDK提供的底层能力
- 模块之间可以相互调用
这种分层的好处是什么?想象你要开发一条供应链链,只需要实现”供应链”模块,其他功能(账户管理、质押、治理)直接复用即可。
模块设计模式
Cosmos SDK的每个模块都是一个独立的Go包,遵循统一的设计模式。以我们的博客模块为例:
plaintext
x/blog/
├── client/           # CLI和gRPC客户端
├── keeper/           # 状态读写的核心逻辑
├── module/            # 模块生命周期管理
├── types/             # 类型定义和验证
├── types/expected_keepers.go  # 模块接口定义
└── keeper/msg_server.go       # 消息处理
keeper是模块的核心,它负责维护应用状态、处理业务逻辑。每个keeper都可以通过接口调用其他模块的能力,这实现了模块间的解耦。
博客模块开发实战
定义数据类型
首先,我们需要在proto文件中定义文章的数据结构:
protobuf
// proto/blog/post.proto
syntax = "proto3";
package blog.blog;

import "gogoproto/gogo.proto";

option go_package = "github.com/user/blog/x/blog/types";

// Post代表一条博客文章
message Post {
  string id = 1;                    // 文章唯一标识
  string title = 2;                 // 标题
  string content = 3;               // 内容
  string author = 4;                // 作者地址
  int64 created_at = 5;             // 创建时间戳
  repeated string tags = 6;         // 标签
  uint64 like_count = 7;            // 点赞数
}

// 创建文章的参数
message CreatePost {
  string title = 1;
  string content = 2;
  repeated string tags = 3;
}
定义好proto文件后,运行生成命令:
bash
ignite generate proto-go
这会自动生成对应的Go类型文件。
实现Keeper逻辑
Keeper负责所有状态读写操作。创建文章的处理逻辑如下:
go
// x/blog/keeper/msg_server.go
package keeper

import (
    "context"
    "fmt"
    "time"

    "github.com/cosmos/cosmos-sdk/types"
    "github.com/user/blog/x/blog/types"
)

func (k msgServer) CreatePost(goCtx context.Context, msg *types.MsgCreatePost) (*types.MsgCreatePostResponse, error) {
    ctx := sdk.UnwrapSDKContext(goCtx)

    // 验证标题长度
    if len(msg.Title) < 1 || len(msg.Title) > 200 {
        return nil, fmt.Errorf("title length must be between 1 and 200 characters")
    }

    // 验证内容长度
    if len(msg.Content) < 1 || len(msg.Content) > 10000 {
        return nil, fmt.Errorf("content length must be between 1 and 10000 characters")
    }

    // 生成唯一ID(使用当前时间戳+作者地址)
    id := fmt.Sprintf("%d-%s", ctx.BlockHeight(), msg.Creator)

    // 创建文章对象
    post := types.Post{
        Id:        id,
        Title:     msg.Title,
        Content:   msg.Content,
        Author:    msg.Creator,
        CreatedAt: time.Now().Unix(),
        Tags:      msg.Tags,
        LikeCount: 0,
    }

    // 写入状态
    k.SetPost(ctx, post)

    // 记录链上事件(用于索引和监听)
    ctx.EventManager().EmitEvent(
        sdk.NewEvent(
            "post_created",
            sdk.NewAttribute("post_id", id),
            sdk.NewAttribute("author", msg.Creator),
            sdk.NewAttribute("title", msg.Title),
        ),
    )

    return &types.MsgCreatePostResponse{
        PostId: id,
    }, nil
}
实现点赞功能
增加点赞功能需要考虑防止重复点赞的问题。我们需要存储每个用户对每篇文章的点赞记录:
go
// 为Post添加Like功能
func (k msgServer) LikePost(goCtx context.Context, msg *types.MsgLikePost) (*types.MsgLikePostResponse, error) {
    ctx := sdk.UnwrapSDKContext(goCtx)

    // 获取文章
    post, found := k.GetPost(ctx, msg.PostId)
    if !found {
        return nil, fmt.Errorf("post %s not found", msg.PostId)
    }

    // 创建复合键:帖子ID + 用户地址
    likeKey := fmt.Sprintf("%s-%s", msg.PostId, msg.Liker)

    // 检查是否已经点过赞
    hasLiked := k.HasLike(ctx, likeKey)
    if hasLiked {
        return nil, fmt.Errorf("you have already liked this post")
    }

    // 记录点赞
    k.SetLike(ctx, types.Like{
        Id:        likeKey,
        PostId:    msg.PostId,
        Liker:     msg.Liker,
        CreatedAt: time.Now().Unix(),
    })

    // 更新文章的点赞数
    post.LikeCount++
    k.SetPost(ctx, post)

    return &types.MsgLikePostResponse{
        NewLikeCount: post.LikeCount,
    }, nil
}
状态存储结构
Cosmos SDK使用键值存储(基于IAVL树)保存状态。我们需要定义存储的键结构:
go
// x/blog/keeper/post.go
package keeper

import (
    "github.com/cosmos/cosmos-sdk/store/prefix"
    sdk "github.com/cosmos/cosmos-sdk/types"
    "github.com/user/blog/x/blog/types"
)

func (k Keeper) SetPost(ctx sdk.Context, post types.Post) {
    store := prefix.NewStore(ctx.KVStore(k.storeKey), []byte("post-"))
    key := []byte(post.Id)
    store.Set(key, k.cdc.MustMarshal(&post))
}

func (k Keeper) GetPost(ctx sdk.Context, key string) (types.Post, bool) {
    store := prefix.NewStore(ctx.KVStore(k.storeKey), []byte("post-"))
    value := store.Get([]byte(key))
    if value == nil {
        return types.Post{}, false
    }
    post := types.Post{}
    k.cdc.MustUnmarshal(value, &post)
    return post, true
}

func (k Keeper) GetAllPosts(ctx sdk.Context) []types.Post {
    store := prefix.NewStore(ctx.KVStore(k.storeKey), []byte("post-"))
    iterator := sdk.KVStorePrefixIterator(store, []byte{})
    defer iterator.Close()

    var posts []types.Post
    for ; iterator.Valid(); iterator.Next() {
        var post types.Post
        k.cdc.MustUnmarshal(iterator.Value(), &post)
        posts = append(posts, post)
    }
    return posts
}
应用链启动与测试
编译与启动
配置完成后,就可以编译并启动我们的博客链了:
bash
# 安装依赖并编译
go mod tidy
make build

# 或者使用Ignite一键构建
ignite chain build
构建成功后,使用单节点模式启动:
bash
# 启动单节点测试网络
blogd start

# 或者指定数据目录
blogd start --home ~/.blogd
成功启动后,你会看到类似输出:
plaintext
I[2026-04-24|08:10:25.123] service start                             module=proxy impl=ProxyService
I[2026-04-24|08:10:25.124] Starting RPC HTTP server                 module=jsonrpc address=tcp://localhost:26657
I[2026-04-24|08:10:25.125] Starting ABCI Block Listener             module=proxy impl=ABCIBlockService
I[2026-04-24|08:10:25.126] Committed state                          module=state height=1 txs=0
使用CLI交互
区块链启动后,通过命令行客户端进行交互:
bash
# 创建测试账户
blogd keys add alice
blogd keys add bob

# 查看账户余额
blogd query bank balances $(blogd keys show alice -a)

# 发布文章
blogd tx blog create-post \
    --title="我的第一篇链上博客" \
    --content="这是我在Cosmos博客链上发布的文章!" \
    --tags="cosmos,sdk,blockchain" \
    --from=alice \
    --chain-id=blog \
    --node=tcp://localhost:26657

# 查询文章列表
blogd query blog list-post

# 点赞文章
blogd tx blog like-post <post_id> --from=bob --chain-id=blog

# 查询特定文章
blogd query blog show-post <post_id>
编写集成测试
为确保代码质量,我们需要编写测试用例:
go
// x/blog/keeper/msg_server_test.go
package keeper_test

import (
    "testing"

    "github.com/cosmos/cosmos-sdk/testutil/testutil"
    sdk "github.com/cosmos/cosmos-sdk/types"
    "github.com/stretchr/testify/require"
    "github.com/user/blog/x/blog/keeper"
    "github.com/user/blog/x/blog/types"
)

func TestCreatePost(t *testing.T) {
    _, k, ctx := setupKeeper(t)

    // 准备测试消息
    msg := types.MsgCreatePost{
        Creator: "cosmos1xxxxxxxxxxxxxxxxxxxxxxxxxxxxxxxxxxxxxxx",
        Title:   "测试文章",
        Content: "这是一篇测试文章的正文内容。",
        Tags:    []string{"test", "cosmos"},
    }

    // 调用CreatePost
    resp, err := keeper.NewMsgServerImpl(k).CreatePost(sdk.WrapSDKContext(ctx), &msg)

    // 验证结果
    require.NoError(t, err)
    require.NotEmpty(t, resp.PostId)

    // 验证状态
    post, found := k.GetPost(sdk.UnwrapSDKContext(ctx), resp.PostId)
    require.True(t, found)
    require.Equal(t, msg.Title, post.Title)
    require.Equal(t, msg.Content, post.Content)
    require.Equal(t, uint64(0), post.LikeCount)
}

func TestCreatePost_EmptyTitle(t *testing.T) {
    _, k, ctx := setupKeeper(t)

    msg := types.MsgCreatePost{
        Creator: "cosmos1xxxxxxxxxxxxxxxxxxxxxxxxxxxxxxxxxxxxxxx",
        Title:   "",  // 空标题应该被拒绝
        Content: "内容",
    }

    _, err := keeper.NewMsgServerImpl(k).CreatePost(sdk.WrapSDKContext(ctx), &msg)
    require.Error(t, err)
    require.Contains(t, err.Error(), "title length")
}
运行测试:
bash
go test -v ./x/blog/keeper/...
IBC跨链通信配置
Cosmos SDK的杀手级特性是IBC(Inter-Blockchain Communication)协议,它允许不同区块链之间进行可信的资产和消息传递。启用IBC功能非常简单:
bash
# 为博客链添加IBC功能
ignite scaffold module blog --ibc

# 添加跨链帖子功能
ignite scaffold packet post [title] [content] --ack post_ack
这会自动生成IBC相关的代码,包括:
- IBC端口注册
- 跨链通道建立流程
- 跨链消息的发送和接收处理
配置跨链通道需要在两条链上都执行握手协议:
bash
# 在目标链(假设是osmosis)上创建通道
osmosisd tx ibc connection handshake \
    --chain-id=blog \
    --connection-id=connection-0 \
    --port-id=blog \
    --channel-id=channel-0
部署与运维建议
生产环境配置
将应用链部署到生产环境时,需要注意以下配置:
toml
# ~/.blogd/config/config.toml

# tendermint配置
moniker = "blog-chain-mainnet"
persistent_peers = "id1@node1:26656,id2@node2:26656"
seeds = "id@seed:26656"

# RPC服务
[rpc]
laddr = "tcp://0.0.0.0:26657"

# p2p网络
[p2p]
max_num_inbound_peers = 100
max_num_outbound_peers = 50

# 状态数据库
[db_backend]
type = "goleveldb"

# 索引配置
[tx_index]
indexer = "kv"
状态快照与升级
Cosmos链支持无风险的软件升级,治理提案通过后会自动执行升级逻辑:
bash
# 创建升级提案
blogd tx gov submit-proposal software-upgrade v2.0.0 \
    --title="升级到v2.0.0" \
    --description="添加新功能和性能优化" \
    --upgrade-height=1000000 \
    --from=alice \
    --chain-id=blog

# 质押代币投票
blogd tx gov vote 1 yes --from=validator --chain-id=blog

# 检查投票结果
blogd query gov votes 1
总结与进阶路线
通过本文,我们完整构建了一条基于Cosmos SDK的博客应用链。核心内容包括:
开发层面:
- 使用Ignite CLI快速初始化项目结构
- 通过Protobuf定义链上数据类型
- 实现Keeper进行状态管理
- 添加自定义消息类型处理业务逻辑
架构层面:
- 理解了Cosmos SDK的模块化设计理念
- 掌握了模块间解耦和接口调用的模式
- 学会了IBC跨链通信的配置方法
进阶方向:
- 安全审计:使用Starport的安全分析工具检查合约漏洞
- 性能优化:学习IAVL树优化和状态修剪策略
- 治理机制:实现自定义的链上治理投票逻辑
- 企业应用:研究多签钱包和权限分级管理
Cosmos生态正在快速发展,CosmWasm(WASM智能合约)、CosmJS(JavaScript SDK)等工具链也在日趋成熟。如果你已经掌握了本文的内容,可以继续探索这些高级话题。
下一篇文章我们将深入讲解Rust区块链开发,聚焦于Aptos和Sui等Move语言生态,看看另一个高性能公链阵营的开发模式有何不同。
相关资源
- Cosmos SDK官方文档:https://docs.cosmos.network/
- Ignite CLI官方文档:https://docs.ignite.com/
- Cosmos SDK示例代码库:https://github.com/cosmos/sdk-tutorials
- IBC协议规范:https://github.com/cosmos/ibc
作者简介:本文为区块链开发网站原创教程,专注于Web3技术深度解读与实战分享。
发表回复